3.2 Project List
The Project List contains an overview of projects created in the Private Data folder of the local computer, collected for sharing in a Public Data folder, or even located in the Private Data folders of multiple remote TEMS Discovery peers.
TEMS Discovery provides a multi-user environment. Different users in the same computer can have their own private data folder, hidden from others. Projects created by a user will be visible only to their owner (these are listed under the Private Data tree node in the tree view). However, the computer administrator has the right to control who else has permission to access a particular user's private data folder.
The
Public Data folder is for sharing data among all users. Users can upload their private data to the public data folder, or download data to their private data folder for manipulation. This
Public Data folder can be a network folder. Please see
Measurement Data Storage Options for information about setting up a Public Data folder.
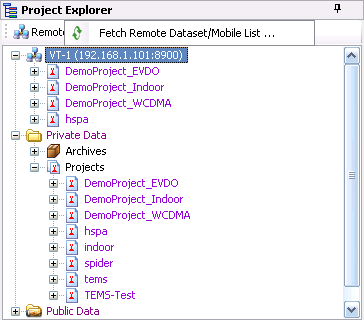
Additionally, TEMS Discovery can connect to remote computers that are also running TEMS Discovery and share data with those computers’ active users. In the tree view, a remote computer will be indicated with its IP address and FTP port number. See
Data Networking for more information.
The Project List is the data portal. The listed projects can be opened to a workspace with certain pre-configured view layouts and/or with pre-defined analysis sets.
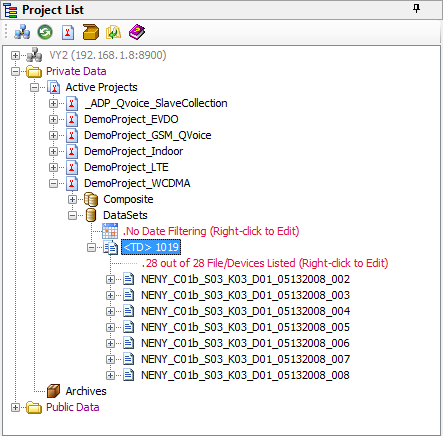
3.2.1 Project List – File/Device Listing Filter
TEMS Discovery provides functions to filter the file/device list by date or by user-selected.
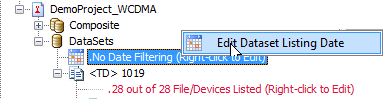
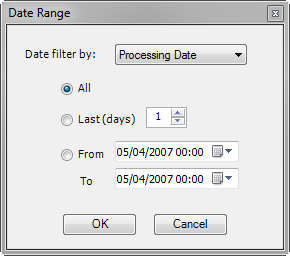
Right-clicking at the tree node shown above will bring up the following dialog for defining date range, so that only the file/devices which are processed or collected within that date range will be listed.
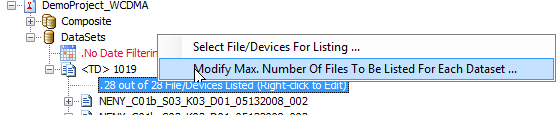
Other than the above date filtering, for each dataset, only up to a certain number of file/devices can be listed. You can select the context menu “Modify Max. Number Of Files To Be Listed For Each Dataset” to modify this maximum number.
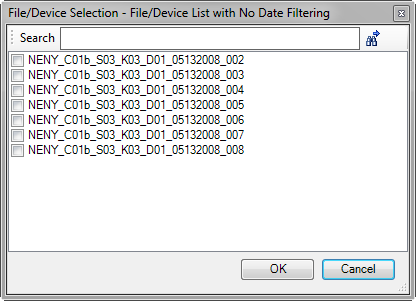
To be more specific, you can manually select the file/device to be listed from the following dialog which can be brought by selecting contaxt menu “Select File/Device For Listing”.
3.2.2 Project List Toolbar
| Remote. Maintain the list of TEMS Discovery peers. See TEMS Discovery Peers and Data Networking for more information. |
| Refresh. Refresh Project List. |
| New. Create a new project. |
| Unpack. Unpack a TEMS Discovery packed project. |
| Close All. Close all opened projects. |
| Help. |
3.2.3 Project List Pop-up Menus
TEMS Discovery Peer
| Fetch Remote Dataset/Mobile List. Fetch a dataset/mobile list that exists in the selected remote TEMS Discovery peer. |
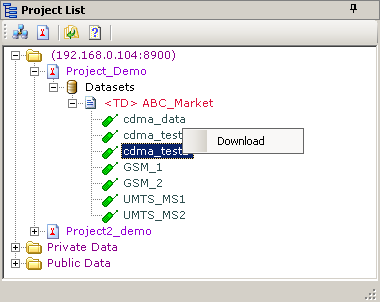
Project, Dataset, or Mobile of TEMS Discovery Peer
| Download. Download selected data from a remote TEMS Discovery peer. The data can be a project, a dataset, or mobile data. TEMS Discovery will automatically compress the remote data, download it, and decompress the data locally. The downloaded data will be listed under the Private Data tree node. |
Archived Project
| De-Archive. De-archive the selected project archive. The de-archived project will be listed under the Private Data tree node. Remove. Permanently remove the selected project archive from the disk. |
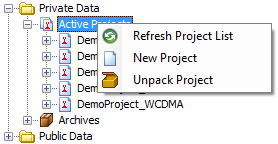
Project Root
| Refresh Proejct List. Refresh the list. New Project. Create a new project. Unpack Project. Unpack a TEMS Discovery packed project. |
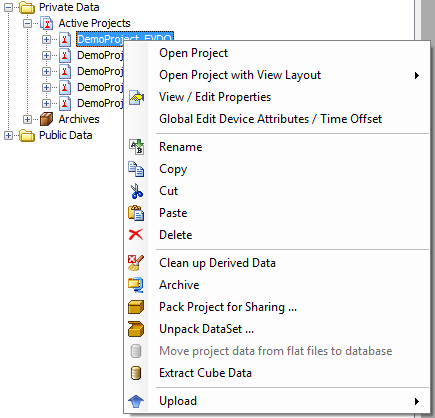
Project
| Open Project. Open the selected project to workspace and restore the last workspace layout. Open With View Layout. Open the selected project to workspace and construct a pre-configured view layout. See Save & Restore Working Environment for more information. View/Edit Properties. View and edit the properties of the selected project. Rename. Rename the selected project. Copy. Copy the selected project. Cut. Cut the selected project. Paste. Paste a project previously copied/cutted. Delete. Remove the selected project permanently from disk. Clean Up Derived Data. TEMS Discovery will generate a lot of processed data from the imported data. Selecting this from the menu will clean up the processed data from disk. Archive. Archive the selected project. The archived project will then be listed in the Archive tree node. Pack Project for Sharing. The entire project can be packed to a .ZIP file for archiving or sharing. This packed project can be unpacked through the context menu described above. Unpack Dataset. Unpack a dataset that was packed from TEMS Discovery. Move project data from flat files to database.** Extract Cube Data.** Upload. Upload the selected project to a TEMS Discovery peer or public data folder. If a project with the same name exists in the TEMS Discovery peer or public data folder, the project will be overwritten. |
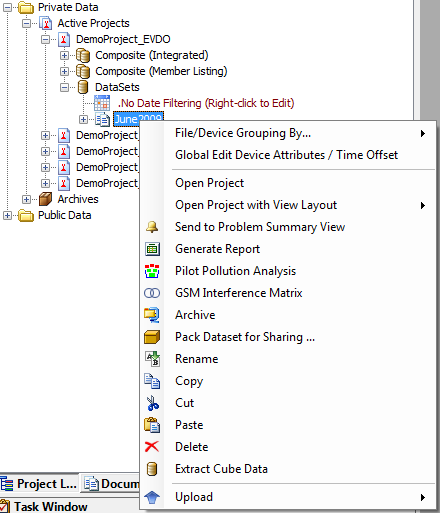
Dataset
| File/Device Grouping By. Mobile data can be grouped by its File name, Device, ESN, IMEI, Label, and Mobile ID, or by any user-defined attributes. See Device Attribute Assignment for more information. Global Edit Device Attributes. Globally edit the attributes of all the devices in the selected dataset. See Device Attribute Assignment for more information. Open Project. Open the selected project to workspace and restore the last workspace layout. Open With View Layout. Open the selected project to workspace and construct a pre-configured view layout. See Save & Restore Working Environment for more information. Send to Problem Summary View. Bring up a dialog for selecting a problem set template (which can be defined in the Report Template Builder) to generate a report of the problem from the selected dataset, and then display the problem report in the Problem Summary View. Generate Report. Generate a report from the selected dataset based on the pre-defined report template, and send the result to Report Excel Viewer. See Report Template Builder for more information. Pilot Pollution Analyzer. Run Pilot Pollution Analysis on the selected dataset. GSM Interference Matrix. Generate a GSM Interference Matrix on the selected dataset. Archive. Archive the selected dataset. The archived dataset will then be listed in the Archive tree node. Pack Dataset for Sharing. The select dataset can be packed to a .ZIP file for archiving or sharing. Rename. Rename the selected project. Copy. Copy the selected project. Cut. Cut the selected project. Paste. Paste a project previously copied/cutted. Delete. Delete the selected dataset permanently from disk. Extract Cube Data.** Upload. Upload the selected dataset to a TEMS Discovery peer or a public data folder. If the project exists in the remote TEMS Discovery peer or public data folder, this dataset will be added to that project; otherwise, a new project will be created as well. |
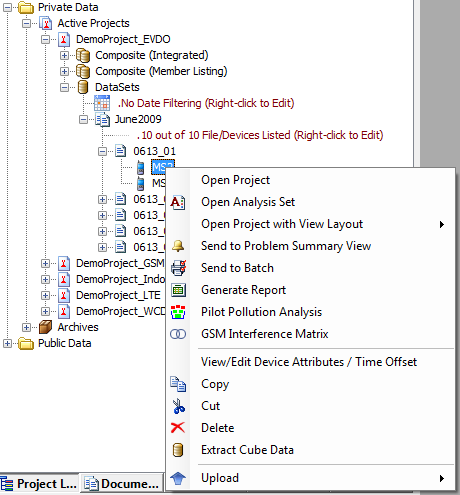
Mobile
| Open Project. Open the selected project to workspace and restore the last workspace layout. Open Analysis Set. Open the selected project to workspace and load the data pre-defined in analysis sets. See Save & Restore Working Environment for more information. Open Project With View Layout. Open the selected project to workspace and construct a pre-configured view layout. See Save & Restore Working Environment for more information. Send to Problem Summary View. Bring up a dialog for selecting a problem set template (which can be defined in the Report Template Builder) to generate a report of problem from the selected device, and then display the problem report in the Problem Summary View. Send to Batch. Generate Report. Generate a report from the selected dataset based on the pre-defined report template, and send the results to the Report Excel Viewer. Pilot Pollution Analyzer. Run Pilot Pollution Analysis on the selected dataset. GSM Interference Matrix. Generate a GSM Interference Matrix on the selected dataset. View/Edit Device Attributes/Time Offset. View and edit the selected mobile's device information. See Device Attribute Assignment for more information. Copy. Copy the selected project. Cut. Cut the selected project. Delete. Permanently delete the selected mobile from the disk. Extract Cube Data.** Upload. Upload the selected mobile to a TEMS Discovery peer or a public data folder. If the project exists in the remote TEMS Discovery peer or public data folder, this mobile data will be added to that project; otherwise, a new project will be created as well. |
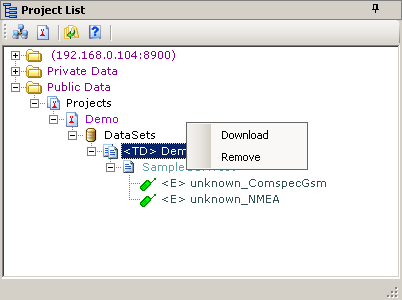
Public Data
| Download. Download the selected project/dataset/mobile to a private data folder. Remove. Remove the selected project/dataset/mobile from the public data folder. This menu is only available to the administrator of the computer, i.e. shared public data folder content can’t be deleted by remote user. |
3.2.4 Project Properties
1. To display the Project Properties dialog, right-click on empty space or the project root, and select View/Edit Properties from the context menu.
2. Complete the Project Properties dialog as described below.
3. Click the
Excluded from peer-to-peer sharing checkbox if you want to make the project invisible to peers (if
Data Networking is enabled).
4. Click the
Save button

to save the changes or click the "X" in the top right corner to exit the dialog.
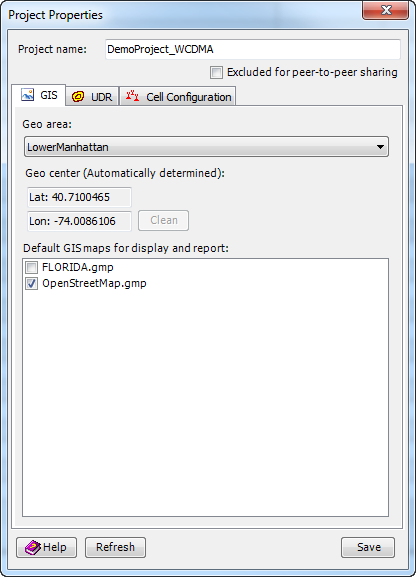
3.2.4.1 Project Properties – GIS Settings
Geo area. The
Geo area combo box lists the available geo areas created by
importing GIS data. Once a geo area is selected, all the maps under that geo area will be listed under
Default GIS combo box.
A geo area can be associated to a project, so that all the maps under that geo area will be listed in the
Data Explorer–GIS List and available for display in the
Map View.
Geo center. Once a geo area is selected, the center of the selected geo area will be used as the geo center of the project.
Because
Map View is based on Azimuth Equidistance projection, an appropriate geo center is crucial. If you select a geo area for the project, the geo center will be automatically determined from the selected geo area, otherwise, the geo center will be determined from the first data (drive test data, cell configuration, or maps, etc.) to be displayed in the Map View. You have the option to clean up the current geo center and force TEMS Discovery to determine a new geo center. In some circumstances, this could solve some Map View distortion problems.
Default maps for display and report. You have the option to select multiple maps so that they will be always displayed in the
Map View when it is opened or when it is part of output such as Excel, PDF, or paper printing.
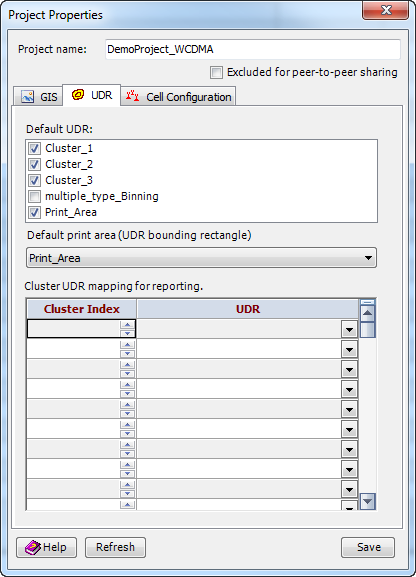
3.2.4.2 Project Properties – UDR Configuration
Default UDR. You have the option to select multiple UDRs so that they will be always displayed in the
Map View when it is opened or when it is part of output such as Excel, PDF, or paper printing.
Default print area (UDR bounding rectangle). TEMS Discovery provides several features such as
Reporting,
Batch Printing, and
Batch PDF View to output data in the
Map View. Instead of leaving TEMS Discovery to automatically determine output area, you can create a UDR in the Map View and select that UDR as the output boundary.
Cluster UDR mapping for reporting. In this spreadsheet, you can create indexes for cluster UDRs. When you create the report template in the
Report Template Builder, you can select an index in
Report Options so that only the data collected in the corresponding UDR will be considered for reporting.
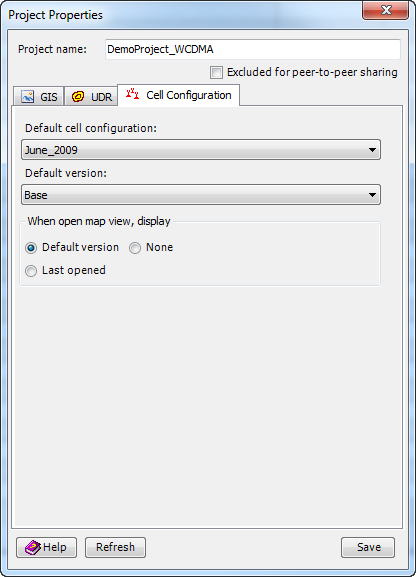
3.2.4.3 Project Properties – Cell Configuration
The default cell configuration defined here will be used for generating Cell ID frames and
Map View reports (if prompted to include cell configuration in the
report template), as well as other functions that require the presence of a cell configuration.
You have the option of selecting a default cell configuration so that it will be always displayed in the
Map View when it is opened, or you can choose to just restore the last displayed cell configuration.
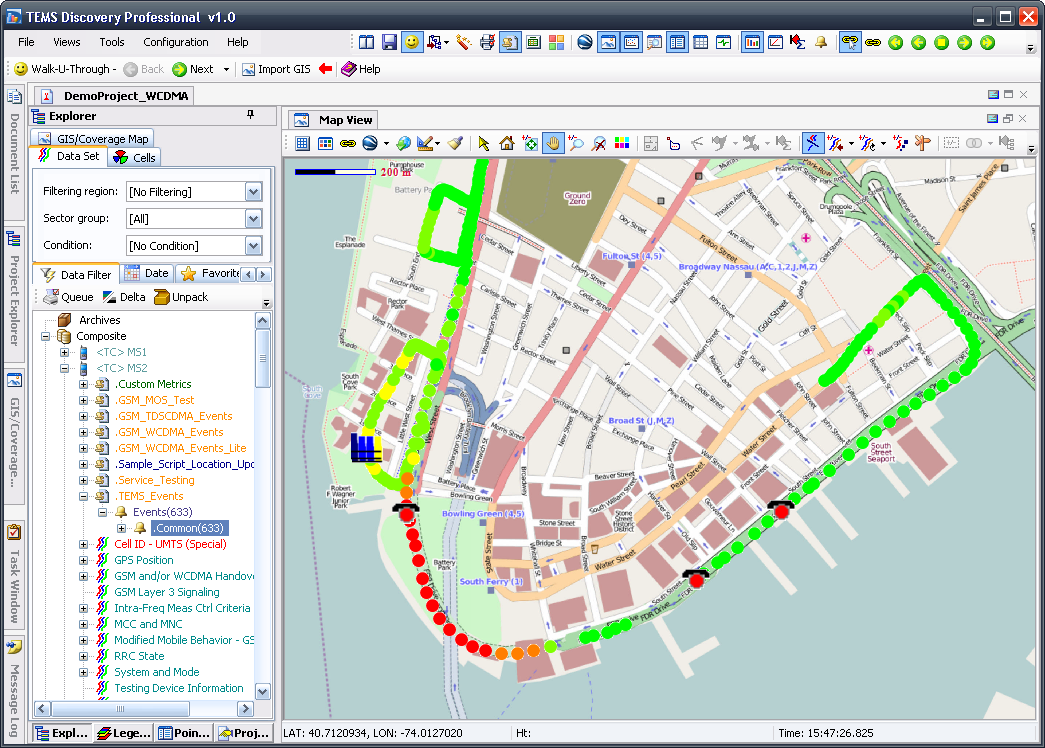
3.2.5 Open Project
From the Project List, you can double-click on a project, or right-click the project field and select
Open Project to open a project. Once a project is open, a
workspace like the one shown below will be created. This workspace contains multiple views that can be turned on or off by their corresponding toolbar buttons or from the File menu.
3.2.6 Delete Project
You can select a project in the Project List, then hit the Delete key on the keyboard or select Delete from the pop-up menu to delete the project. All data belonging to that project will be permanently removed from the disk and cannot be recovered.
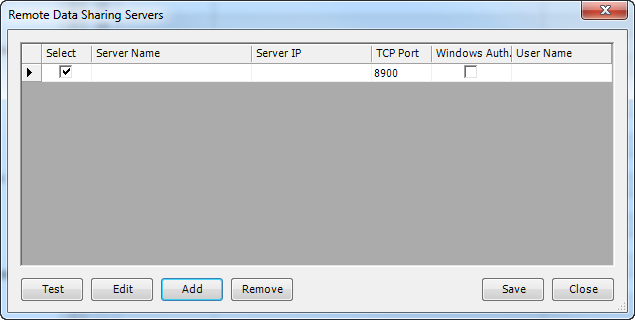
3.2.7 TEMS Discovery Peers
TEMS Discovery maintains a list of TEMS Discovery peers that can access and share data.
Click the
Network button

in the Project List toolbar to bring up the Remote Data Sharing Servers dialog. In this dialog, you can add, remove, or edit TEMS Discovery peers.
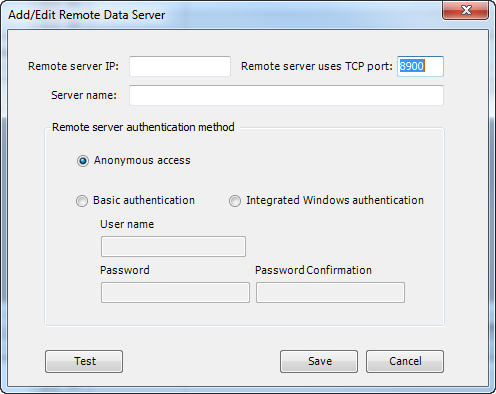
To add or edit a TEMS Discovery peer, click the Add or Edit button to bring up the Add/Edit Remote Data Server dialog.
The settings in this dialog must be consistent with what is defined in TEMS Discovery peer (defined in
Data Networking). Clicking the
Test button
will test whether this specific remote TEMS Discovery peer is accessible.