50.1.1 Manual Recording
|
|
Click the Start Recording button on the Record toolbar. |
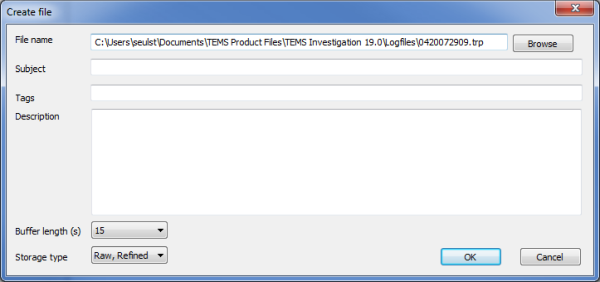
If quick recording is turned on (see section "Further Recording Options"), the recording will start immediately. Otherwise, the following configuration dialog will appear:

|
File name |
The default naming is in the form of a timestamp: |
|
Subject |
Here you can enter free text characterizing the logfile. |
|
Tags |
Use this field to categorize the logfile with suitable keywords. A tag is defined simply by being entered here. Valid keyword separators are comma (,) and semicolon (;). |
|
Description |
Free-text field for describing the logfile. |
|
Buffer length |
Length in seconds of buffered content prepended to the logfile. Min.: 0 s. Max.: 40 s. Default: 15 s. See section "Buffering in Connection with Logfile Recording" for further information. |
|
Storage type |
Select data stream to record to the logfile. See section "Storage type" for further information. |
Fill out this dialog as desired, then click OK.
|
|
Now activate your equipment if you have not already done so. (By starting the recording first you ensure that you capture all relevant measurement data in the logfile.) |
Perform the desired tasks with your external equipment.
|
|
After you have completed all of these tasks, click Stop Recording to end the current recording and close the logfile. Once you have closed it, you cannot log any more data to the same file. |


